Showing posts with label Microsoft Excel. Show all posts

How to lock excel file with password?

Protect your work or task is indeed a very important thing. So that, your work cannot be open by anyone else except you. So avoid any plagiarism of your work. If on word file, you can enter the password to open the file, you can also do it on an excel file. You can lock your excel file with a password, so if there are people who want to open your Excel file they will need a password which only you know. For those of you who do not know how to lock the excel file you can follow every step of the reviews below.

How to lock  excel file?

  1. Open your Excel file, or a new excel page. 

  2. Once you have completed your assignment, please click the "microsoft office icon", its position in the top left corner. 

  3. kuncifileexcel

  4. Then point your mouse to "prepare".

  5. Next, click the "encrypted document".

  6. Enter the password you want, and then click ok. Usually you need  to enter the password again for verification. 


  7. kuncifileexcel

  8. Next, you can save your data as usual. 

  9. It’s done.


Read More »

How do I create graphs on excel?

A graph on a report that about numeric data is important. By adding, a graph gives simple overview about the reports to readers.  How to create a graph on excel is simple. To create a graph, you can follow some instruction below and see the screenshot to get details.

How do I create graphs on excel?

  1. Launch Microsoft excel

  2. Enter you data on table

  3. Block your data that you will create the graph


  4. buat grafik di excel

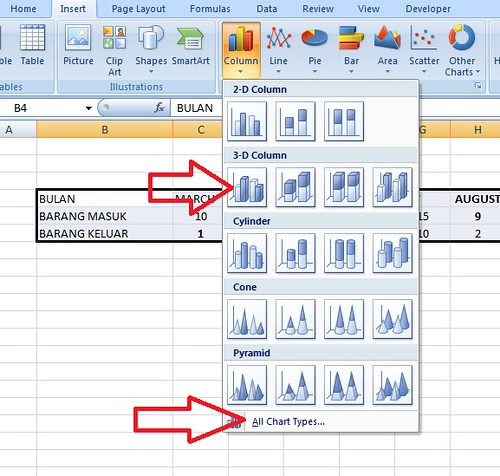
  5. Click “insert”

  6. Choose the type of graph that you want


  7. buat grafik di excel1

  8. Then the graph will show automatically


  9. buat grafik di excel2

  10. The graph showed without any information. You can add any information by clicking the graph, then click “Layout”. For example you can add title by clicking “Chart title” etc.


  11. buat grafik di excel3

  12. Finish.


Read More »