Showing posts with label Word 2013. Show all posts

How to hanging the indentation in word 2013 quickly

When you set the paragraph in MS Word, you may have to use hanging indentation for the first line text. In Word 2013, you can hang the indentation of first line text of the paragraph easily.  Then, how do you set the hanging indentation? It's easy, following the steps below.

How to hanging the indentation in word 2013 

First steps. Launch the Word 2013 application and open your file. Then select the paragraph that you want to use hanging indentation on it.

Second steps. You click the page layout tab on the ribbon and see the paragraph group. Then you click the arrow head in the corner of paragraph group.word paragraph indentation
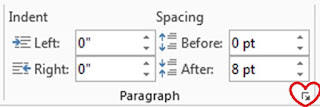
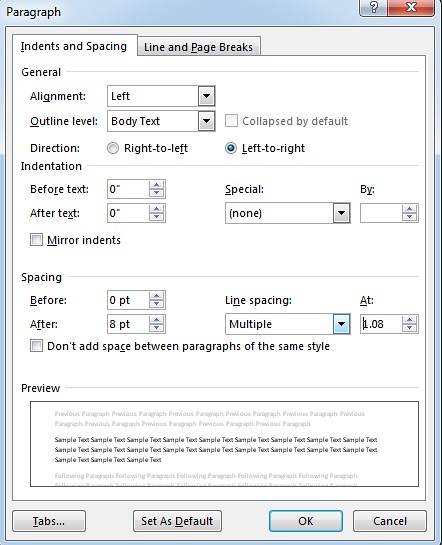
Third steps. After the paragraph window appears. Next, you click the special drop-down and select hanging. At last, you click the “OK” button.
word 2013 paragraph line spacing 

Notes:
If you want to set the setting of indentation as default, then you can click “Set as Default” before you click the OK button.
Read More »

How to insert a check-box in Word 2013 quickly

When you create a form in Microsoft Word 2013, you may need to insert some check box to your document. By adding check box to your form will make the respondent easier to fill your form.. How to insert check box in Word 2013 is easy. However, before you insert it, you have to make sure that the developer tab have been appeared on the ribbon. Let's me show you about how to make the developer tab appear and how to insert the check-box.
Checkbox
How to insert a check-box in Word 2013

First step, show the developer tab 


If you can see the developer tab on the ribbon, then you can skip this step and go to the second steps. Nevertheless, if the developer tab didn't appear on the ribbon, then let us make it appear first.  Follow the instruction below:

How to show it? First, you have to click the “File” tab. Then you click “Options”.
word file export pdf
Next, you will see the word options dialog opened. Then, you click “Customize Ribbon” on the left pane. In addition, you check the developer on the main tabs box (see the right pane)
word file options

Second steps, how to insert a check box
Firstly, you click the developer tab. Next, you click the check box button on the controls group.
word developer control
Next, you click “Properties” on the controls group. Moreover, you change the checked symbols to check box by clicking “Change...”
word developer control
If you get hard to find out the check box symbol, then you select “Wingdings 2”for font. Moreover, you will see the check box symbol. Finish the steps by clicking the “OK” button”.
Read More »

How to change the line spacing in Word 2013 and set as default

Spacing here mean is space, space that appear between lines of text or between of paragraph in word document. If you use large numbers for the spaces, then the space between above and bottom of lines text will become too wide.

In Word 2013, spacing which used is multiple spacing by default. However, you are allow to adjust the spacing that you want. Such as single space, double space or other size as you need.

You can adjust the spacing before you type the text or after done it.  How to adjust the spacing before or after typing the text is no different. Also, how adjust it, its simple. Get the steps to adjust line spacing in Word 2013 below.

How to change line spacing in word 2013

First steps. If you have typed the text, then you have to select all of your text. Next, see the paragraph group and you click the “Line and Paragraph spacing” button.

paragraph line spacing

Second steps. Select the line spacing, which are available or you can click “Line spacing options…” to determine how much the spacing.

paragraph line spacing

Third steps.  When the paragraph window appear, then you determine the line spacing number into “Line spacing box”.  At last, you should click the “OK” button.

paragraph line spacing

Notes: if you want to set the spacing as default spacing, then you only need click the "set as default" button. Therefore, you don’t need adjust it anymore when you type in other time.
Read More »

How to show the developer tab in Word 2013

By default, the developer tab is not display in word 2013. However, don’t worry; you can still add the developer tab anytime you want. Then you can use any tool on the developer ribbon quickly. Such as you can use XML commands, write and run macros, use active control etc. How to show the developer tab is easy.  Let’s see the details below!

How to show the developer tab in word 2013
  1. Launch Word 2013
  2. Click the file tab.
  3. word file
  4. Select and click “Options”
  5. word file export pdf
  6. Click “Customize Ribbon”
  7. See the right pane. Check the developer in main tabs dialog
  8. word file options
  9. Click “OK”
Read More »

How to make one page landscape in Word 2013

In Word 2013, you can change the page orientation easily. Such as, you can change all of page to landscape; change a single page to portrait etc. How? Check the details below!

How to make one page landscape in Word 2013

First step; place your cursor at the beginning text of page that you orientate to landscape. Alternatively, you can select the page on the navigation page.  For example, you can select second page.

Pagelayout orientation
Click the image to zoom in
Second step; you click the page layout tab. See the page setup group, and click the arrow at the corner of page setup group.

Pagelayout orientation
Click the image to zoom in
Third step; select the orientation to “Landscape”. Then you click the drop-down arrow of apply and choose apply to this point forward. At last, you click “OK”.

Pagelayout orientation
Click the image to zoom in
Fourth step; after you change the orientation, then you will get all page forward will change to landscape. Next, place your mouse at the beginning text of third page or select third page on the navigation pane.  Then click page layout tab and continuously by clicking the arrow of the corner page setup tab.

Fifth step; change the orientation to portrait, then apply it to this point forward and click the “OK” button. Done.

You can repeat the steps above and apply them to other pages. So some page of your document will have different orientation.

Read More »

How to drop cap text in Word 2013

A large and dropped capital letter at the beginning of text called Drop Cap. How to create a drop cap is easy. Nevertheless, maybe there is someone don’t know about how to create.  Check the details about creating drop cap below.

Model;

word dropcap

How to drop cap text in Word 2013
  1. Select the text
  2. Click “Insert”
  3. word dropcap
  4. See the group of text.
  5. Click “Drop Cap”
  6. Select and the drop cap style.
  7. word dropcap
  8. To customize the drop cap option, then you click “Drop Cap Options…”
  9. word dropcap
  10. Click “OK”
Read More »

How to insert object in Word 2013

In word 2013, you can complete your document by adding one or more object. Such as you can insert MS Excel worksheet, you can insert other file as object, and also you can insert text from other document. Get the details below!

How to insert object in Word 2013
  1. Click “INSERT”
  2. See the text’s group
  3. Word Insert object
  4. Click “Object”
  5. Select the object that you want to insert.
  6. word 2013 insert object
  7. In addition, you can click “Create from file” to create the object from file. Click the browse button to select a file and check “link to file”
  8. Word Insert object
  9. Click “OK”

How to insert texts from other word document
  1. Click “INSERT”
  2. See the text’s group
  3. Click the drop down arrow
  4. Word Insert object
  5. Click “Text from file…”
  6. Select a file and click Insert”
Read More »

How to insert header in Word 2013

In word 2013, you can insert and remove header easily. You can customize the header by adding document title, page number or insert shape. Read the steps to insert and remove the header in detail below.

How to insert header in Word 2013
  1. Click the insert tab and see “Header & Footer” group.
  2. Click “Header”
  3. Word Insert Header
  4. You can select the header that are available or you can click “Edit Header”
  5. word 2013 insert header
  6. Type your header
  7. Word Insert Header
  8. Click “Close Header and Footer”

How to remove header in Word 2013
  1. Click “Insert”
  2. Click “Header”
  3. Click “Remove Header”
Read More »

How to change themes in Word 2013

In word 2013, you can create a document easily. You can apply the default theme or pick other theme to your document. In addition you can also design your own theme. Unique and attractive theme and use it next time.

How to change themes in Word 2013
  1. Click “DESIGN”
  2. Click “Themes”
  3. word design
  4. Select and click the themes.
  5. word design
  6. To reset the theme, then you have to click “Reset to Theme from Template”
  7. Click “Save Current Theme” to save the current theme, so you can use at other time.
  8. Click “Colors” to change the color theme.
  9. word design
  10. You can use other tools on the ribbon to experiment with your own theme.
Read More »

How to turn on spelling and grammar checker in Word 2013

When you create a documents in word 2013, you may need to turn on spelling and grammar checker. So you will be know immediately when there are spelling and grammar error.  Then you can fix it soon. In word 2013, you can select the options to turn on or turn off spelling and grammar checker. How do I turn it on? Check it below!

How to turn on spelling and grammar checker in Word 2013
  1. Click “FILE”
  2. word file save
  3. Click “Options”
  4. word file export pdf
  5. Click “Proofing”
  6. Find “When correcting spelling and grammar in Word”
  7. word option proofing
  8. Check and uncheck the below options
    • Check “Check spelling as you type”
    • Check “Mark grammar errors as you type”
    • Check “Frequently confused words”
    • Check “Grammar with spelling”
    • Uncheck  “Hide spelling errors in this document only”
    • Uncheck “hide grammar errors in this document only”
  9. Click “OK”
Read More »

How to insert SmartArt in Word 2013

When you create a document in word 2013, may you ever have data that you cannot describe using phrase. Such as, sequence of hierarchy, a list, process, relationship etc.  If you have a data as I have mentioned, then you can use SmartArt to describe it.

There are many SmartArt category and style that you can choose. For example, see SmartArt style above! How to insert SmartArt into a word document is easy. Get the direction below!

How to insert SmartArt in Word 2013
  1. Click “INSERT”
  2. See the illustrations group
  3. word insert illustration
  4. Click “SmartArt”
  5. Select and click the SmartArt model
  6. word 2013 insert smartart
  7. Then click “OK”

How to change SmartArt Design in Word 2013

You can change the design of SmartArt easily. Such as, add shape, show text pane, change the layouts, change the variation colors, change SmartArt styles and reset graphic. For example, you can follow the instruction below to change the SmartArt colors.
  1. Click on SmartArt area.
  2. Click “DESIGN”
  3. word insert illustration
  4. Click “Change Colors”
  5. Select and click the SmartArt color
  6. word insert illustration
  7. Done.
Read More »

How to insert table in Word 2013

When you create a document in word 2013, you not only type texts, but also you can insert other object to complete your document.  Such as insert tables, pictures, shapes, SmartArt, chart, etc. however, now I will share you about how to insert table and organize it in word 2013 easily.

How to insert table in Word 2013
  1. Click “INSERT”
  2. Click "Table"
  3. word 2013 insert table
  4. Drag your mouse to select grid to create table.
  5. Alternatively, you can click “Insert Table…”
  6. Enter the number of columns and the number of rows that you want to insert.
  7. word 2013 insert table
  8. And then click “OK”

How to change table’s style in Word 2013
  1. To change the table’s style you have to click on table area first. 
  2. word table style
  3. Then click “DESIGN”.
  4. See the table style group.
  5. Click the drop down arrow to get more style.
  6. Select and click the table style, and the style will apply to your table.
  7. word table style

How to merge and split the cells of table in Word 2013
  1. Select the table, one or more.
  2. Click "LAYOUT"
  3. word table style
  4. Click “Merger Cells” to merge.
  5. Click “Split Cells” to split.
Read More »

How to insert a blank page in Word 2013 correctly

In word 2013, you can insert a blank page to the middle of your document easily. Without you need to press enter and enter until a new page appears. This way generally use by people who do not know about how to use insert blank page feature.

You need to know, if you insert a new page by pressing enter and enter, then the position of data in a new page will change when you make changes in earlier page. I thought that would make your document desultory. However, if you insert a new page by using insert blank page feature, then your document won’t be change, although you make changes in earlier page.

How to insert a blank page in Word 2013 correctly
  1. Direct your cursor in to the end of phrase where you want to insert new page.
  2. Click “INSERT”
  3. word insert page
  4. See the page group.
  5. Click “Blank Page”
  6. Done.
Read More »

How to insert superscript in Word 2013

Sometime you need to write a text whose position higher than normal text in word document. For example in the writing of chemical formula. Text whose position higher than normal text is called superscript. And text whose position lower than normal text is called subscript. You can insert subscript or superscripts in word 2013 easily.

How to insert superscript in word 2013
  1. Click “Subscript” or “Superscript” in the font group. Type your text. And if you have finished typing superscript, so click “Subscript” or “Superscript” to returning to normal typing. 
  2. Insert Superscript
  3. Or you can click “Insert”
  4. Click “Equation”
  5. word 2013 insert header
  6. Click “Script”
  7. word 2013 insert equation
  8. Select and click “Script”. Edit the scripts manually.
Read More »

How to insert watermark in Word 2013

There are many ways to protect your word documents from others. Besides you can protect a document by using passwords, you also can insert watermark to document page.  Watermark can be sign about the copyright of document, as a sign of ownership documents, etc. you can insert watermark to your document in word 2013 easily.

word 2013 design watermark

How to insert watermark in word 2013
  1. Click “DESIGN”
  2. word 2013 design watermark
  3. Click “Watermark”
  4. Select and click the watermark form which are available.
  5. If you want to use a particular text or your own image, so you can click “Custom Watermark…”
  6. word 2013 design watermark
  7. If you want to use picture as watermark, so click “Picture watermark” and then click “Select Picture…” 
  8. word 2013 design watermark3
  9. And if you want to add a particular text as watermark, so click “text watermark”. And then enter your texts on the text box.
  10. Click “Apply” and click “OK”
Read More »