Blog is not something new anymore. Everyone has a different reason and purpose creating a blog. There are people who creating a blog just to share experiences and knowledge, writing journals, business etc. I thought that everyone could create a new blog. If you can use computer or smartphone, then I'm sure you can create a blog.
There are some blog platform that you can choose to create a new blog, free or paid platform. Nevertheless, if this is your first time create your own blog, then I suggest you to choose blogger platform. Why I suggest it? Because blogger it is easy to use.
Tables of content
A: Go to your blog settings and click “Search Preferences”. Then click “edit” on Meta tags description and type your blog description. Then, the search description box automatically show up.
Q: Why cannot I see the dynamic views template in the template selection? I want to use it
A: Go to your blog settings and click “Other”. Then you change the allow blog feed to “Full”. Dynamic views template enabled and you can apply it to your blog.
Q: what is my blog need to qualify for Google AdSense?
See the Eligibility to participate in AdSense here. I thought if you have seen the button of “Sign up for AdSense” is active, then your blog is ready for Google AdSense.
Q: is there a limit to create blogs on blogger?
A: Yes, there is. You can create up to 100 blog. Read the limits on blogger here.
Q: Can I delete my blog?
A: Yes, you can. Go to blog setting and click “Other”. See the blog tools and then click “Delete Blog”. Your blog will deleted permanently after 90 days. So, you have chance to undelete your blog before 90 days.
Q: How to avoid blog from banned?
A: Don't violate Blogger Policies. Read more about Blogger Policies here.
Read More »
There are some blog platform that you can choose to create a new blog, free or paid platform. Nevertheless, if this is your first time create your own blog, then I suggest you to choose blogger platform. Why I suggest it? Because blogger it is easy to use.
Tables of content
- Preparing to create a new blog
- Creating a new blog on blogspot
- Create your blogger profile
- Creating your first blog post
- Creating Pages
- Arrange the layout
- Change and customize template
- Blog settings
- Associate to Google+
- Make money from blog
- FAQ
Preparing to create a new blog
Choose your topic. You can post anything to your blog and cover a large topic. However, you better to specify a topic for your blog. That would make your visitor stay a long in your page to read your other post with the same topic.
Specify the blog title. Determine the right and catchy blog title. That will attract and easy to remember by visitor. Whenever they want to look for your blog page, then they only need type and search it into internet.
Get a Gmail account. As you know, to create a blog in blogger platform you need a Google account to sign in. if you have created Gmail or Google Drive, then you can use it to sign in. or you create a new Google account first for free.
Creating a new blog on blogspot
How to create a new blog in blogger is very easy. If you confuse about the steps, then follow the procedure below.
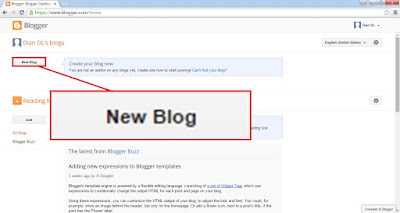
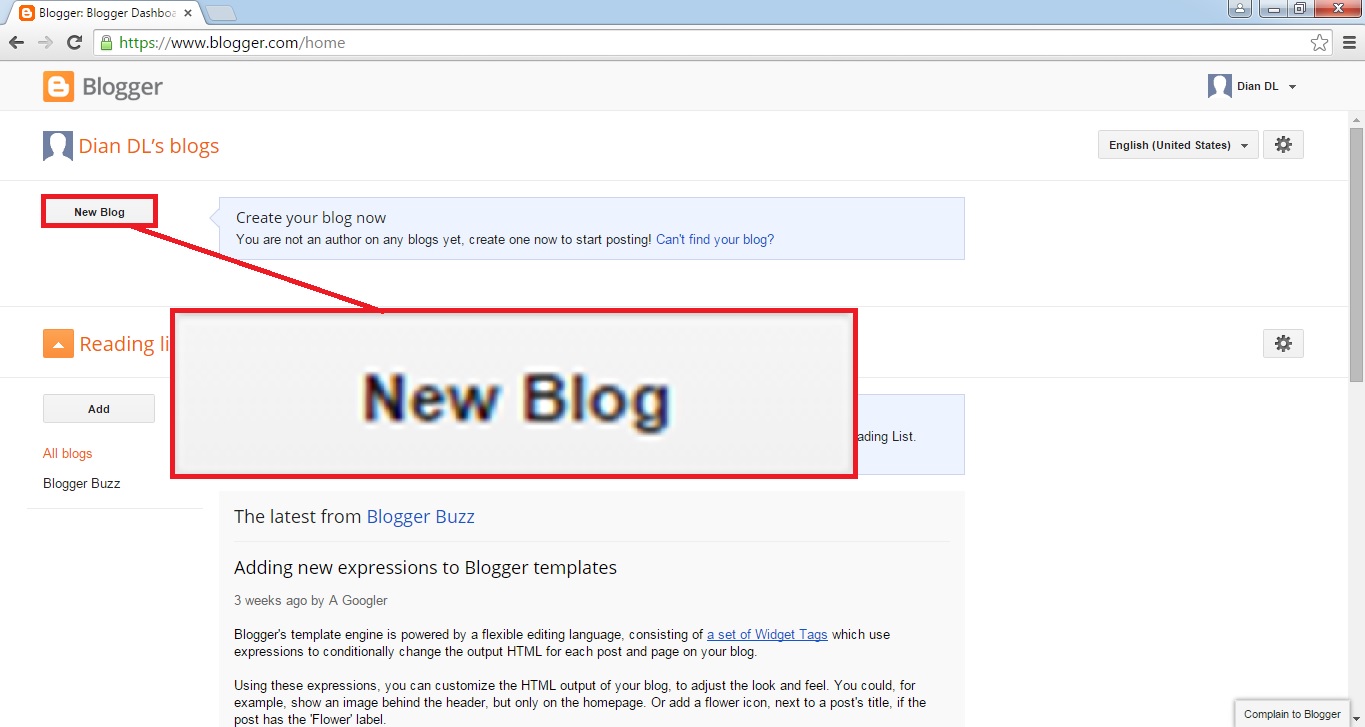
First steps, go to blogger's site, www.blogger.com. Then you sign in to blogger by using your Gmail account.
Second steps, you click "New Blog"
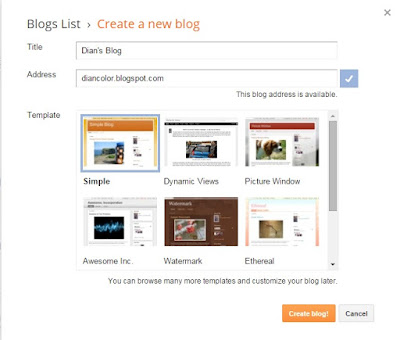
Third steps, enter the blog title, the URL of blog and the blog's template.

At last, click "Create a blog!”. Congratulations, your blog have successfully created.
Create your blogger profile
Go to the blog dashboard by sign in to blogger. See the top corner and click on your name. Then click “Blogger profile” and edit your profile.
Create your blogger profile
Go to the blog dashboard by sign in to blogger. See the top corner and click on your name. Then click “Blogger profile” and edit your profile.
Creating your first blog post
Next step of starting a new blog is publish content. You can publish an article, a combination of articles and videos, a combination of articles, Image and video or etc. to learn how to publish a post, follow the direction below!- Sign in to www.blogger.com by using Gmail account.
- Click on the blog name.
- Click "New Post"
- Create your post content on the post editor page.
- Complete the setting of post.
- Before you publish your content, you can preview your post first.
- Publish your content by clicking the publish button.


Note:
You can create page to complete your blog. For example, you can create basic pages. Such as, about page, contact page, TOS page, Sitemap page or etc. Basically, how to create a page in blogger is no different by how to creating blog post. Check the details below!
- You can add images by uploading, from Picasa web albums, from your phone, from your webcam or from a third-party such as Flickr.
- You can add videos by uploading, from YouTube, from your YouTube’s video, from your phone or your webcam.
- You can collect your post to specify categories by using labels. You click “Labels” on the post settings, enter the category/label and click “Done” when you finished it. Use commas to separate the labels.
- To schedule your post, then you click “Schedule” on the post setting and set the date and time.
- Be default, the address of your post will be generate automatically. However, you can customize it by clicking “Permalink” on the post settings.
- Type the description of your post on “Search Description” box. If there is no “Search Description” box, then you have to enable Meta description of you blog first. See how to enable it on the blog settings description.
- Create content about something you love or something that was popular.
- Use 5W1H to evolve your content idea.
- Stay away from plagiarism
You can create page to complete your blog. For example, you can create basic pages. Such as, about page, contact page, TOS page, Sitemap page or etc. Basically, how to create a page in blogger is no different by how to creating blog post. Check the details below!
- Go to dashboard
- Click your blog name
- Click “Pages”
- Click “New page”
- Create your page content
- Publish your page
Layout – arrange the blog’s gadget/widget
Add a new gadget to blog.
To change blog template go to your blog dashboard and select your blog. You click “Template” on the left navigation pane. Direct your cursor to the blog template until show “Apply to Blog” and click it to apply the template to your blog.
Customize the blog template – Blogger Template Designer.
Through the Blogger Template Designer, you can customize some of the following points:
- Select your blog
- Click the layout tab.
- Click “Add a gadget”
- Select and click a gadget that you want.
- Then click the save button.
Change and customize template
Change blog template. In blogger are available some default template that you can apply to your blog. Such as several templates covered by a few categories. Examples; simple template, picture window template, awesome Inc., watermark, Dynamic template, ethereal, travel and classic.To change blog template go to your blog dashboard and select your blog. You click “Template” on the left navigation pane. Direct your cursor to the blog template until show “Apply to Blog” and click it to apply the template to your blog.
Customize the blog template – Blogger Template Designer.
Through the Blogger Template Designer, you can customize some of the following points:
- You can change the template through of here.
- Change the background image and the main color theme.
- Adjust widths of the right sidebar and the entire blog.
- Change the body and footer layout of gadget arrangement.
- Customize the advanced template. Include add CSS, change the font and color of page text, change the outer background, main background and header background color etc.
- Alternatively, you can clear the advanced changes.
How to customize the blogger template is simple.
- Go to your blog dashboard and select the blog.
- You click on the template tab. Moreover, then the page of Blogger Template Designer will show up.
- Click “view blog” button, to get preview of change.
- Click “Apply to blog” to apply the changes.
Use the blog template that you’ve downloaded.
Do you want to upload template that you’ve downloaded? Follow this direction. Go to your blog. You click the “template” tab and then click on the Backup/Restore button. Next, choose the template file that you downloaded and at last click the upload button.
Note:
Before you change your template, I suggest you to back up your template first. Therefore, if you got error and frustrated when you edit new template, then you can restore your old template. How to back up the template, go to your blog, click the template’s tab, click the Backup/Restore button and then click “Download full template”. In addition, to restore your old template, then you upload your old template.
Blog Settings
Change blog title, blog description, blog address, blog readers, and add or remove blog authors through of blog settings.
Google+
By clicking the Google+ tab, you can associate your blog with your personal Google profile or page. You can set to automatically share after posting, prompt to share after posting, and use Google plus comments on your blog.
Earnings - Make money from blog
When your blog is qualified for Google AdSense, then you can sign up to Google AdSense through the Earnings tab and waiting for approval. Then you place the ads code to your blog and make money from your blog.
Frequently asked questions
Q: Why cannot I see the search description box on the post settings?A: Go to your blog settings and click “Search Preferences”. Then click “edit” on Meta tags description and type your blog description. Then, the search description box automatically show up.
Q: Why cannot I see the dynamic views template in the template selection? I want to use it
A: Go to your blog settings and click “Other”. Then you change the allow blog feed to “Full”. Dynamic views template enabled and you can apply it to your blog.
Q: what is my blog need to qualify for Google AdSense?
See the Eligibility to participate in AdSense here. I thought if you have seen the button of “Sign up for AdSense” is active, then your blog is ready for Google AdSense.
Q: is there a limit to create blogs on blogger?
A: Yes, there is. You can create up to 100 blog. Read the limits on blogger here.
Q: Can I delete my blog?
A: Yes, you can. Go to blog setting and click “Other”. See the blog tools and then click “Delete Blog”. Your blog will deleted permanently after 90 days. So, you have chance to undelete your blog before 90 days.
Q: How to avoid blog from banned?
A: Don't violate Blogger Policies. Read more about Blogger Policies here.


